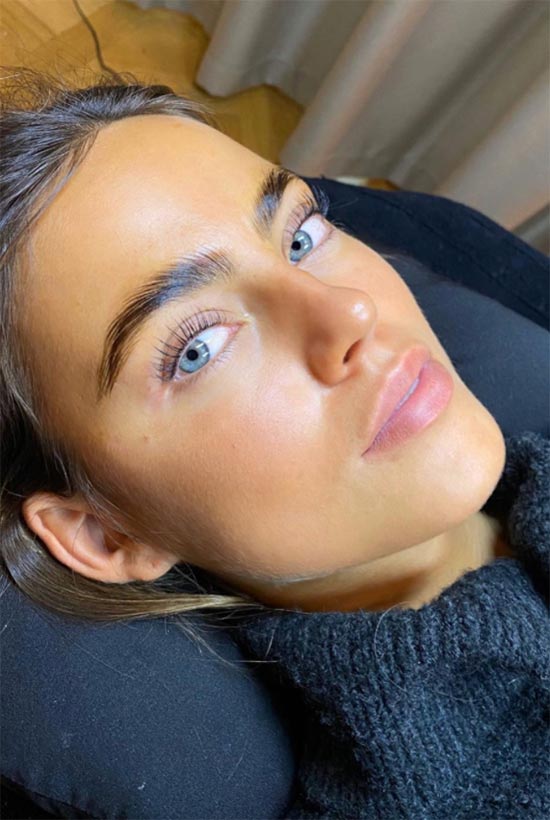
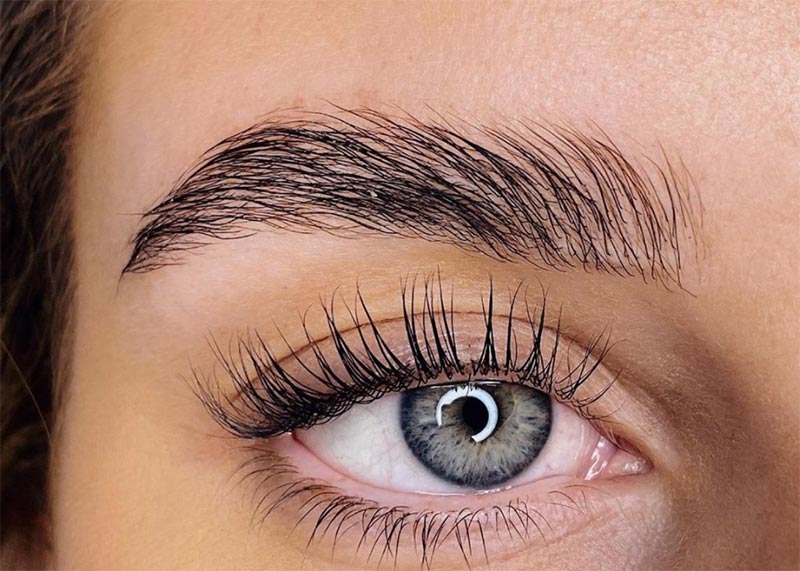
- A lash lift is a semi-permanent perm for eyelashes that lifts and curls them for a fuller look.
- While you can use at-home lash lift kits, for safety measures and a flawless look, it’s advised to go to the salon to get the treatment done.
- A lash lift can last from 6 to 8 weeks with proper care involved.
If your eyelash curler is your favorite beauty tool, you might want to consider an eyelash lift. Lash lifts are perms for your eyelashes that give them the kind of curl and lift you could only dream of achieving with a curling tool.
Lash lifts have been a popular salon service for a long time now. With so many of us self-isolating these days, the idea of using a lash lift kit at home becomes more and more appealing. However, unlike eyebrow lifts, eyelash lifts are a little more complicated since you’re bringing all of those chemicals a lot closer to the eye.
If you’re gung-ho about your desire to do your own lift, we’ve selected the best lash lift kits available online. Then, we get into all of the details about eyelash lifts, with the most thorough guide you can imagine on how to do it by yourself. We’ll discuss what it is and how it’s done, compare it to other eyelash treatments you can try, and talk about their safety.
If you do decide to lift your lashes, whether at home or at the salon, we also have some must-know aftercare tips included. If you decide to visit the salon, we’ll let you know how much you can expect to pay, along with tips for choosing the right service provider.
In this article:
- 5 Professional Lash Lift Kits to Use at Home
- What Is a Lash Lift?
- Lash Lift vs. Lash Extensions
- Eyelash Lift Pros & Cons
- Is It Safe to Use Lash Lift Kits at Home?
- What Is the Process of a Lash Lift?
- How Long Does a Lash Lift Last?
- Lash Lift Aftercare & Maintenance
- Eyelash Lift Costs at the Salon
5 Professional Lash Lift Kits to Use at Home
These are our favorite eyelash lift kits, if you’d like to take a risk and try it at home.
1. Vassoul Lash Lift Kit
This is one of the most popular lash lift kits you can buy online, and probably for a good reason. The packaging is very cute, and it includes everything you’ll need for up to 15 applications. The set has all of the liquids that cleanse, prepare, and perm the lashes, as well as silicone stickers that protect the eyelid and help shape the lashes.
The only thing missing from the kit is applicators for the liquids, but you can use a regular cotton bud. It also comes with comprehensive instructions, so you won’t be left guessing what is what. Order it from Amazon!

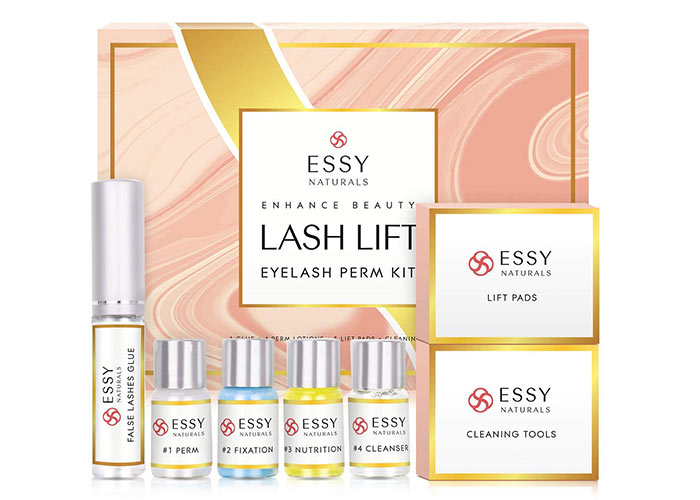
2. EssyNaturals Eyelash Perm Kit
This is another solid lash lift kit you can try. It includes the same basics as the Vassoul kit, and the different solutions even have the same color, so we suspect it’s crafted by the same manufacturer. It offers the same results as a salon-product would, that’s for sure, although the glue isn’t particularly strong, so you’ll want to purchase a different one separately.
The instructions that the kit comes with are not the clearest, but you can just follow our advice further down in the article. You can order it from Amazon.
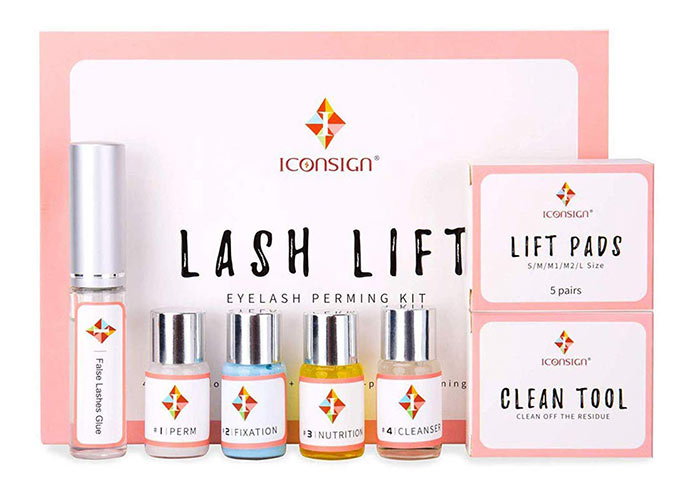
3. Iconsign Lash Lift Eyelash Perm Kit
This lash lift kit goes on sale often, so it’s our favorite choice for those on a budget. It’s just as good as the more expensive ones and enough product for 10-13 lifting sessions. It includes a diverse range of silicone pads, so you can get the perfect curl and fit. Our favorite thing about it is that it comes with an instruction video, so you don’t have to guess at anything. You can get it from Amazon.
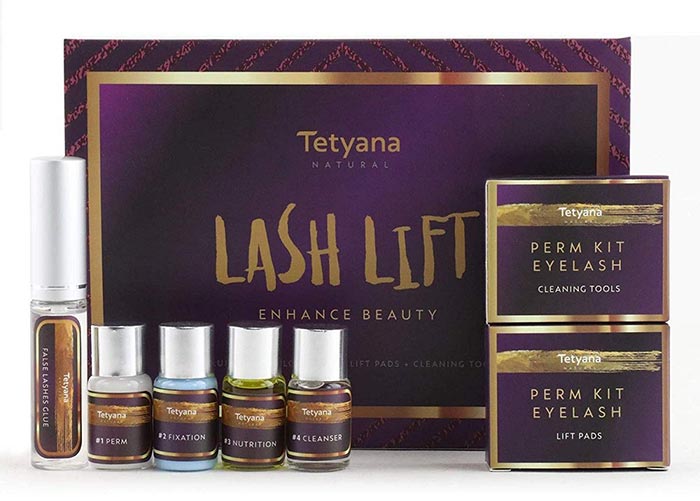
4. Tetyana Naturals Eyelash Perm Kit
If you stick to a darker aesthetic, we think you’ll like how this lash perm kit is packaged. Otherwise, it’s not too different from the other lash lift kits, offering a great looking eyelash lift at a reasonable price. It comes with silicone pads, all of the solutions you could possibly need, and a Y-shaped brush, but you’ll need to supply other basics like cotton pads or buds by yourself. You can pick it up from Amazon.
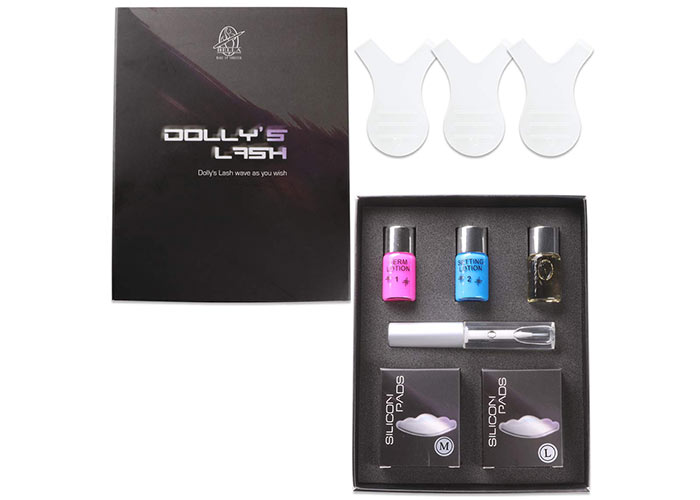
5. Beauticom Dolly’s Lash Lift
This is our final lash lift kit selection. It’s a simple set that comes with a glue, perming lotion, setting lotion (their name for the fixative) and a nourishing oil. It doesn’t include a cleanser, so you’ll need to have micellar water or makeup remover on hand to use at the beginning and some cotton pads for wiping the eyes afterwards.
It’s a great choice if you have bigger eyes since it comes only with medium and large silicone pads. The glue in this kit is nicer than in a few of the others, although it probably still won’t be as good as your favorite latex-free lash glue. Buy it on Amazon!
What Is a Lash Lift?
A lash lift is a perm for the eyelashes, using the same chemicals that are used for a hair perm. It helps to reshape the lashes in a way that is effectively permanent so that they always look flawlessly curled.
Most lash lift kits include a perming solution and a fixative, which are the key products for a lash lift, along with extra goodies like a lash glue, a cleanser, and a lash oil. The lashes are cleaned and then glued with a lash glue to rounded silicone pad or to rods. While forced into this shape, they undergo a process that forces them to stay more curved permanently.
The perming solution is the most important part of lash lift kits because it makes the lashes more malleable. The active ingredient in it is ammonium thioglycolate, which is an alkaline chemical (i.e. the opposite of an acid) that has the unique ability to break disulfide bonds in the hair. Disulfide bonds are responsible for the structure and shape of each hair strand, so once broken, the hairs can be restructured in a new way. It’s the same ingredient used in hair dyes and hair perms.
The next step is a fixative, which neutralizes the perm solution and locks the lashes into their new, curled shape. The active ingredient in the fixative is either sodium bromate (which is banned in Canada because it can be carcinogenic if inhaled regularly) or hydrogen peroxide.
This entire process takes between 45 minutes to an hour when done by a professional. When doing it at home, you will likely have to spend a lot more time since you can only do one eye at a time, and you’ll probably have to take things slow when gluing down each individual lash.
Lash Lift vs. Lash Extensions
A lash lift is a semi-permanent eyelash curling method, which makes the lashes look longer and helps to open up the eyes. It’s fantastic for anyone with very straight or downward-angled lashes, but the truth is that nearly anyone will see some difference with it.
On the other hand, eyelash extensions are a semi-permanent technique of gluing individual false lash fibers to the existing lashes. This makes the eyelashes look fuller and longer, and depending on how the lashes are glued on, it will also help open up the eyes. It’s a great choice for those with sparse or short lashes.
So, it’s pretty simple: if you’d like your existing lashes to have more of a lift and curl, choose a lash lift, while if you just want longer, fuller lashes, then choose extensions. If your lashes are a little too straight, but you’d also like that false eyelash look, then you can combine the two services! You can have an eyelash lift first, followed by an eyelash extension application.
It’s also worth noting that eyelash extensions have a much fussier aftercare process when compared to lash lifts, and you need to be very careful not to touch or rub your eyes after having them done.
The other common salon service that involves the lashes is a lash tint, which is an eye-safe hair dye that colors the lashes black or dark brown. Tinting can be combined with both lash lifts and extensions to further amp up the drama by making your natural lashes darker.
Lash Lift Pros & Cons
Here is a quick summary of the pros and cons of a lash lift, so you can make an informed decision about whether it’s right for you.
Pros
- Because of the upwards angle, the lashes look longer and stand out a lot more.
- The eyes look large, open, and awake.
- Can be combined with extensions or other eyelash services.
- Prevents lashes from getting into the eyes.
- The effects are very long-lasting, so it’s great before vacations or travel.
Cons
- The chemicals in lash lift kits break the protein bonds in the lash hairs, making them slightly dry and brittle.
- If you have an allergy to the lash lift ingredients, your eyes can end up irritated, red, or swollen – we highly recommend patch testing the products on the skin first!
- As the lashes grow out, they grow back in their natural direction, so you end up with a wonky combination of lashes going in different directions.
- Because of the previous bullet point, re-lifting the lashes regularly becomes important, but that can be quite the hassle and may also weaken the lashes over time.
- Lashes can end up too curly, frizzy, or tangled if the lift is done incorrectly.

Is It Safe to Use Lash Lift Kits at Home?
The answer to this question is complicated, but the short answer is that you definitely take on a risk by using lash lift kits at home. While it’s clearly possible to DIY a lash lift, and while many users report great success, the undeniable fact is that a good lash lift requires some skill and delicacy, or it can end in disaster.
The most common negative reaction to the lash lift ingredients is a simple skin allergy that usually goes away after a few days. This can occur whether you do a lash lift at home or at the salon, so we recommend a patch test no matter what.
A lash lift has to be timed very carefully and leaving the solution for longer than the recommended amount will over-process the lashes, which will make them very brittle and kinky.
One thing that’s a little concerning is that most DIY lash lift kits do not provide a full ingredient list. So, while we know most of them are based on the same active ingredients, it’s still hard to predict allergies to other ingredients.
Getting any of the solutions in the eye is also something to worry about. When doing a lash lift by yourself, it’s very difficult to keep one eye open and the other one closed. The liquids, especially the perm and fixative, can sting and burn.
In a worst-case scenario, it can burn the eye or lead to an infection, which could ultimately lead to blindness. If you happen to get any eyelash lift products in your eye, rinse it thoroughly with cold water for at least 20 minutes.
What Is the Process of a Lash Lift?
Whether you want to do it yourself or just want to be ready for your salon visit, here are the steps involved in lifting lashes. Before we get into it, we have some preparatory safety tips.
Lash Lift Safety Tips
- Do a patch test at least a day before planning the lash lift to make sure you’re not allergic to the various chemicals in the kit.
- If you normally wear contacts, make sure to remove them before lifting your lashes.
- Don’t use lash growth serums like Latisse for a day or two before and after the lash lift to minimize the chances of irritation.
You Will Need
- Eyelash lift kit that includes at least silicone pads, perming solution, fixing/ neutralizing solution, and nutritive oil
- Your own eyelash glue since the ones in the kit are usually not very good
- Cotton buds, tissues, and cotton pads
- Cling wrap
- An eyelash comb or toothpick
Lash Lifting Process
- It’s important to start with makeup-free eyes. You can wash your face and then dry it gently, or using a cotton pad saturated with micellar water or makeup remover, but make sure no product residue is left on your skin.
- If your lashes are extremely straight, you can curl them with an eyelash curler to make the gluing-down process easier and more comfortable.
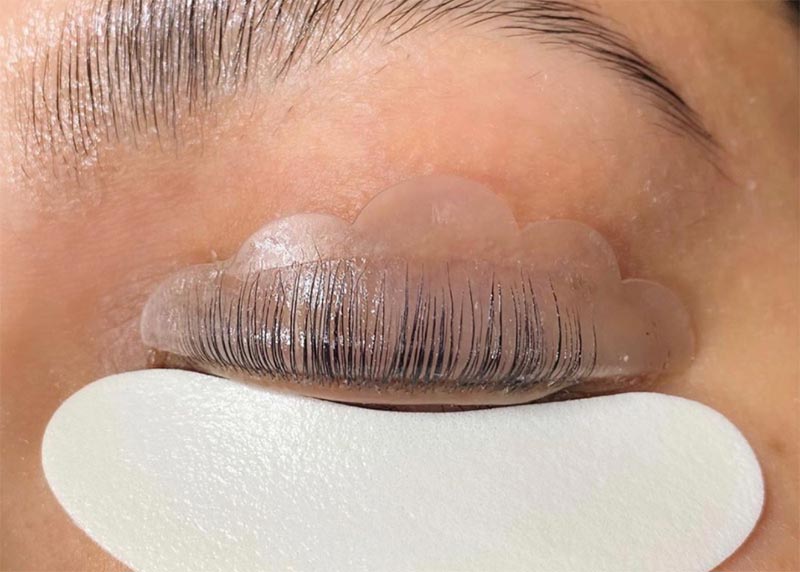
- Next, a rounded silicone pad needs to be attached over the eyelid. Eyelash lift kits usually come with a selection in a few sizes, so choose the size that fits over your lid most easily. It’s a good idea to spread a thin layer of lash glue over the back of the silicone pad so it can adhere to the eyelid without moving or lifting.
- When you attach the silicone pad to the lid, make sure it sits very slightly above your lash line without covering the base of the lashes. Hold it in place for a few moments to make sure it’s managed to adhere.
- The next step is to glue the lashes to the silicone pad. Most lash lift kits come with a plastic, Y-shaped tool that’s supposed to help with the job, but in reality, it’s better to use a toothpick or small eyebrow/ eyelash comb and work a small cluster of lashes at a time, covering them with a thin layer of lash glue, so they adhere to the silicone pad.
- Be extra careful to make sure the lashes are glued straight up and that they don’t stick to each other or cross over each other because once permed, that’s how they’ll stay, and you’ll end up with tangles.
- Once your lashes are glued up nicely, your next step is to apply the perming solution. Only apply the perming solution from the root to about halfway up the lash, using a cotton bud. If you go up all the way to the end of the lash, you’ll end up with overly curly and potentially frizzy lashes.
- Once you’re done applying the perming solution, wait for 10-12 minutes. You can apply cling wrap over the eye, which will help trap heat and help the process along. It’s better to err on the side of removing the perm too early than too late to avoid over-processing and damaging the lashes.
- Once the time has passed, wipe off the excess perming solution with a dry cotton pad or cotton bud.
- Next, apply the fixing/ neutralizing solution just like you did the perming solution. Once again, leave it on for 10-12 minutes and cover your eye with cling wrap if you like.
- Next, saturate a cotton bud with a lash oil (usually included in the kit) and wipe it over the lashes from the root up. This will remove the bulk of the neutralizing solution and will also help nourish the lashes.
- Now, saturate a cotton bud with the cleansing solution (if it’s not included in the kit, just use the oil or an oil-based makeup remover) and work it through the lashes to remove any excess eyelash glue.
- Once the lashes are no longer attached to the silicone pad, you can gently peel it off and then use more of that oil or cleanser to take off the excess glue on the lid.
- That’s it! With your lashes looking amazing on one eye, you can move on to the other eye!
- Remember not to get your lashes wet for the next 24 hours, or you can ruin all of that hard work.
How Long Does a Lash Lift Last?
If you’re committed, you will need to get an eyelash lift every 6-8 weeks. A lash lift is a type of perm, and that means that its results last as long as your eyelashes stay attached to you.
We lose an average of 1-5 eyelashes per day, but as those fall out, new ones will grow as well. After a couple of months, you sport a brand-new set of lashes, and all the permed lashes will be gone.
However, eyelash growth can start being a problem as early as 4 weeks in because half of your lashes will be lifted, while the other half will be natural and straight. It’s better to wait a few weeks longer rather than to immediately re-perm the lashes to avoid over-processing.
Lash Lift Aftercare & Maintenance
As far as beauty services go, eyelash lifts are not too demanding, but we still have a few important aftercare tips.
- The most important thing to keep in mind is that you can’t let your lashes get wet for the first 24 hours! Even a little bit of water can destroy the perm. This means no shower, no steam, no face washing, and no getting caught in the rain. Keep this in mind when scheduling your lash lift. Obviously, you don’t want to do it the day before an important event.
- After a full day, you can go back to normal. You might want to be a little extra gentle with your makeup removal, but the lashes are so delicate that we’d recommend being careful with that at all times, lift or no lift.
- To help strengthen your lashes, consider using a nourishing eyelash serum or botanical oil as a nightly treatment once the 24 hours have passed.

Lash Lift Costs at the Salon
A DIY lash lift kit will only set you back $30-$50 or so and will last for multiple uses. An eyelash lift at the salon is a little pricier, costing between $75-$150 for a single session. This is because you’re paying for the added safety and luxury of having an experienced professional do the procedure with salon-quality products.
When choosing where to get your eyelash lift done, please be selective. You might be able to find a salon that can do a great job for a lower price, but in general, if a price seems too good to be true, take the extra step to make sure the salon is legit.
Choose a salon that comes recommended, either through online reviews or by word of mouth. Give them a call or chat with the aesthetician and ask about safety, procedure, and aftercare. If they seem knowledgeable, you can be confident that they know what they’re doing and that your lashes will be in safe hands!
Photos via @beatsbylizzie, @leighdickson, Instagram